What you should never forget about hay bales
There are more than 400,000 dairy farmers in Kenya, with the majority keeping dairy cattle on small plots and in the urban and semi-urban environments. They meet the year-round demand for milk for the growing population, which is driving the increasing need for hay bales. Large-scale dairy farmers graze their cattle in fields or embrace zero grazing, and in extreme dry seasons, they can substitute with straw bales to supplement the depleted grass.
There is, however, a surprising lack of knowledge about the correct specifications for straw bales.
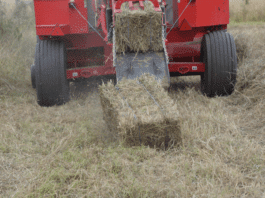
A standard conventional two-string hay bale should measure 90cm x45cm x 35cm and weigh a minimum of 15kg, with 18-22kg being optimal. All too often, we see bales that fall short in both weight and length, but the price remains the same!
It is important that the bale density, size and weight be of an acceptable standard to give the farmer as more nutrient value for his or her money. Healthy livestock contribute to Kenya’s food security.
The standard bale length is twice its width, which means they can be stacked efficiently for cost-effective transportation. Bales should be stacked with their twines (used to bind hay) facing upwards to prevent damage during loading and to give stacking stability.
A hay bale that is stacked on its side so that twines are not visible from the top tends to break when being handled, leading to loss. Having bales twice as long as they are wide, minimises unnecessary air gaps during transportation
The bale density is important and hay balers are designed to compress as much dried grass into a smaller area to help preserve the nutrient value and make it easy to transport from farm to cow.
The market for hay is attracting more farmers to grow grass as a crop for baling. A range of haymaking equipment is readily available to meet their needs, including mowers, rakes and balers, which all work behind tractors.
In recent years, we have seen the introduction of mower conditioners, which reduce the moisture content of the grass when cutting to speed up the drying, whilst preserving the nutritional value. This consists of the standard mower and a roller attachment that crushes the grass after cutting to bring out moisture within the stem. When using a mower conditioner, the drying period before baling is drastically reduced.

Six points to note when operating hay balers:
- Shear bolts
Shear bolts (used to protect equipment from overload or sudden impact), such as flywheel, knotter, and needle shear bolts, break when foreign objects obstruct the bailing mechanism to protect the baler drive chain. The
correct adjustment of the slip clutch is important to protect the PTO (power take-off) and baler gearbox.
The breakage can also be caused by overload on the knotter, or needles. Overload can be determined by checking the bale density setting on the baler. Read your operator’s manual, or ask a qualified technician to guide you through this task.
- Pickup assembly
Failure in the assembly is caused by lack of greasing, hitting foreign objects or ground speeds that are too high for the windrow.
- Broken Needles
These are caused by loose needle bolts, incorrect timing of the needles so they are out of time with the plunger, and or presence of foreign objects in the bale or baling chamber needle slots.
- Wear on the sides of the needle eye
The twine guide at the back of the stuffer chamber, when not aligned with the needle eye causes this.
- Poor Bale Shape
A number of things can cause this. They include a blunt plunger and ledger knives, an uneven windrow, the auger stripper being absent, or the plunger stuffer getting misaligned due to wear in the bale chamber. This can be
corrected by sharpening knives and adjusting the bearings to help the plunger run true.
Poor bale length is caused by failure of the metering wheel. In this case, a new metering wheel should be fitted. Spares should be available from your dealer.
- Knotter
It is important to grease this daily. However, some of the issues with the knotter are caused by the twine finger not picking up the twine from the needle. This can be corrected by adjusting the finger. Another failure is when there is no knot in either twine, which indicates that the billhook is not rotating. This is corrected by replacing the pin in the billhook pinion. There are other failures such as frayed twine ends, twine cuts, or double bowknot. To resolve these issues, always refer to your operator’s manual.